The year-end close is the final step in the annual financial reporting process of a business. It involves reexamining the company's financial record to identify any irregularities, such as balances and deficits that should be carried over to the following fiscal year. It helps reduce the likelihood of encountering a significant issue by providing the business with a regular opportunity to assess its financial situation. Closing the books yearly allows businesses to generate financial statements that give owners information about the financial health of their businesses.
In NetSuite, there are two methods for closing a book: automatic and manual. NetSuite strongly recommends the use of the automatic close method. In this method, users just need to follow the procedures outlined in the Period Close checklist. Once automatic close is enabled, NetSuite automatically closes the year-end after all of the periods included in the year are closed, so users are not required to specifically perform a formal year-end closing. Balances will reflect as retained earnings on the balance sheet. In contrast, when using the manual close method, users need to create journal entries to close income statement accounts to the balance sheet.
NetSuite Year-End Closing Best Practices
Use the Period Close Checklist
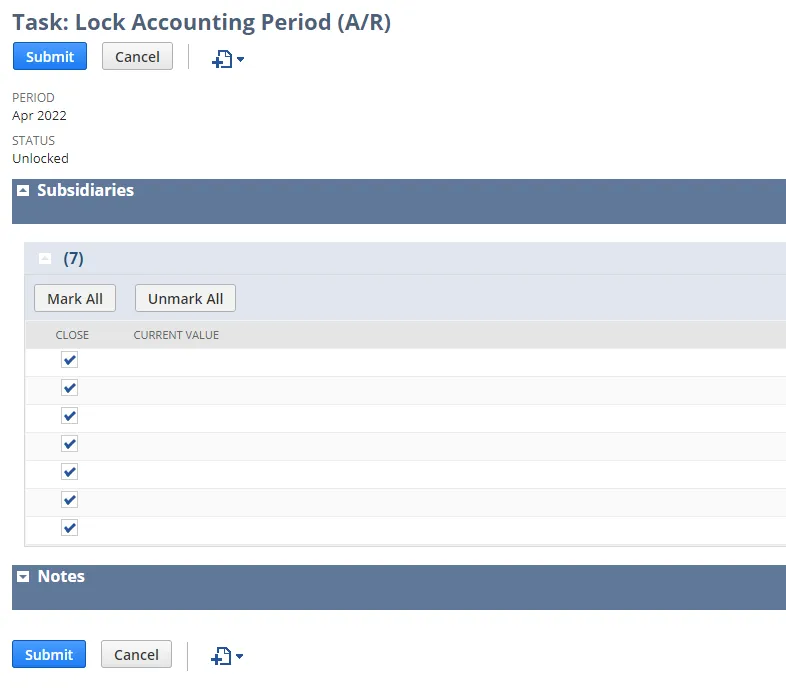
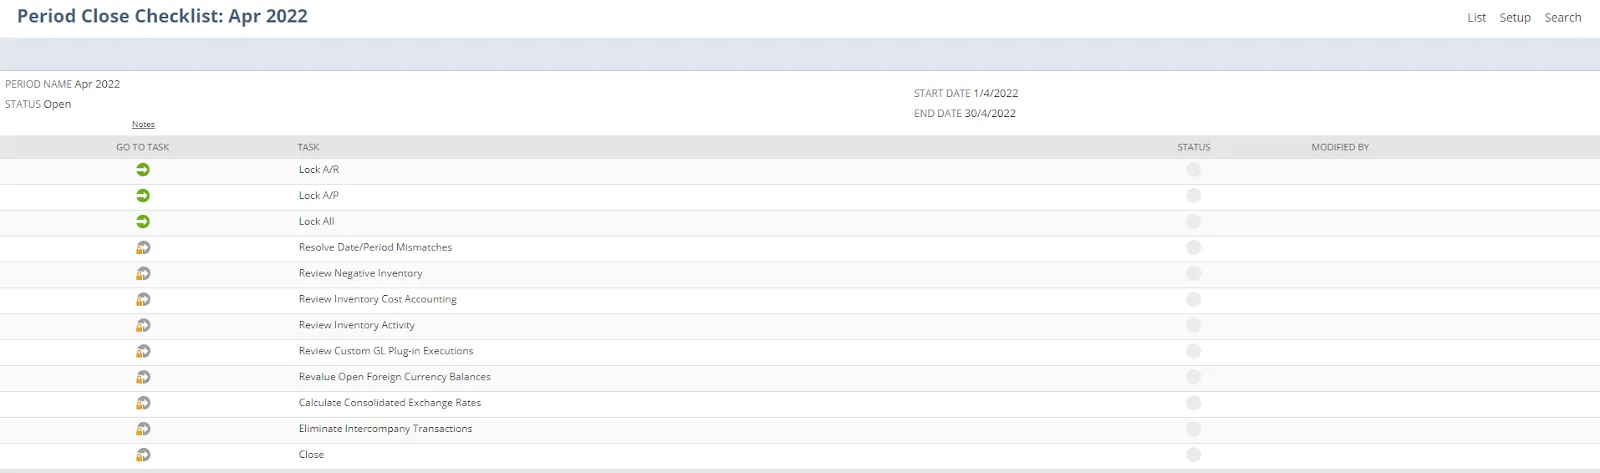
This checklist serves as a guide through the period's closure process. Users can complete the required task in sequence and then close the period. To use the checklist, Go to Setup > Accounting > Manage G/L > Manage Accounting Period. Click the Checklist icon for a period. To close a period, users must first lock out the transactions related to accounts payable, accounts receivable, and payroll. Once locked, users can begin reviewing the accounts and make any necessary adjustments.


Using Rules
Using Rules
Icons in the Go to Task column provide the links to the individual task pages where users can review the details and take action. Some tasks may not be accessible until the prerequisite tasks are completed. Review the task in the checklist and ensure that all transactions are accounted for before locking the task.
- To prevent A/R transactions in the period, click Using the Period Close Checklist for Lock A/R, then click Submit.
- To prevent A/P transactions in the period, click Using the Period Close Checklist for Lock A/P, then click Submit.
- To prevent Payroll transactions in the period, click Using the Period Close Checklist for Lock Payroll, then click Submit.
You can also prevent A/R, A/P, and payroll transactions in the period by clicking Using the Period Close Checklist for Lock All, then click Submit.
It is vital to distinguish between closing a period and locking transactions for a period:
- Locking transactions for a period prevents a user without override permission from posting to the period, which is a preliminary task before closing occurs.
- Closing a period prevents anyone from posting any transactions using any dates included in the period and should be the final step after reviewing and reconciling all accounts.
Additional Notes:
- Users won’t be able to close a current period if the previous period is still open.
- When a period ends, it is regarded as complete, and no one can add or make general-ledger-related changes to the period's posting transactions. If a closed period requires subsequent alterations, the period must be reopened before the changes can be completed.
- NetSuite has a feature called the Quick Close preference that enables users to close one or more accounting periods with a single click, but a certain permission is required to use this feature.

Generate Revaluations
For businesses that operate in multiple currencies, it is critical to revalue open currency balances at the end of each accounting period before closing it in order to calculate the unrealized gain or loss due to exchange rate fluctuation. The exchange rates as of the last day of the accounting period will be used. However, if users generate revaluations prior to the end of the period, the current exchange rate will apply.
Simplify the Chart of Accounts
A well-organized chart of accounts speeds up the closing process. It simplifies transaction categorization and improves reporting. A disorganized chart of accounts invites errors that cause delays in closing.
Accounts Should be Reconciled More Frequently
An increased frequency of account reconciliations not only provides quick insight into the financial position of the business but also aids in the detection of any errors in the financial record at an early stage, allowing users to rectify them before the start of year-end close. Unresolved errors will cause a delay in closing.
Proactive Preparation
While no accountant enjoys year-end close, it is a vital element of the business cycle. The process can be overwhelming and stressful because it is necessary to complete all the tasks within a particular timeframe while achieving 100% accuracy in the reports generated. However, with the right strategy in place, it is easy to achieve a seamless and successful year-end close.
The most important preparation for simplifying the closing process is keeping an accurate book throughout the year. Accountants should reconcile all accounts regularly to greatly reduce the amount of labor required for year-end, since accounts that are reconciled monthly can be automatically considered as reconciled at year-end closing.
Year-end accounting relies heavily on modern technologies because they enable businesses to automate operations, significantly aiding in transforming the reconciliation process from reactive to proactive.
Automation helps promote proactive reconciliation, where accountants perform the reconciliation daily or weekly, allowing them to review each transaction as it occurs while still fresh on the employee's mind who incurs the expense. It provides more timely and accurate results because automation technology helps integrate data from disparate sources such as credit transactions, banking transactions, and receipts. It offers a workflow for accountants to request more information from the employees and reconcile the transaction shortly after it’s incurred. Without automation technology, accountants would still be stuck in the traditional reactive reconciliation process, which requires them to perform reconciliation only when it is required for book closing, typically at the aggregated account level due to time constraints.
This guide’s chapters explain the best practices for simplifying the process of year-end closing. Our recommended methodology ranges from efficiently reconciling various types of transactions to intuitively organizing the chart of accounts.
- Chapter 1: NetSuite Credit Card Reconciliation. Learn NetSuite’s credit card reconciliation workflow process, best practices, and limitations, with step-by-step instructions.
- Chapter 2: NetSuite Bank Reconciliation. Explore the features of NetSuite’s bank reconciliation functionality step by step.
- Chapter 3: NetSuite Chart of Accounts Best Practices. Understand the best practices for planning a NetSuite chart of accounts, such as using NetSuite classifications, assigning account numbers, and selecting short descriptions.
- Chapter 4: Charge-Based Billing NetSuite: Tutorial & Instructions
Learn where charge-based billing fits amongsts NetSuite’s options for managing professional service engagement and follow step-by-step instructions. - Chapter 5: NetSuite Bank Reconciliation Difference: Tutorial & Instructions. Understand the common causes of a bank reconciliation difference in NetSuite and follow instructions and explanations to resolve it.
- Chapter 6: NetSuite Trial Balance: Tutorial & Instructions. Learn the types of trial balance reports in NetSuite, follow instructions for customizing it, and get tips for balancing an accurate report.
- Chapter 7: NetSuite Intercompany Reconciliation: Best Practices & Instructions. Learn the types of trial balance reports in NetSuite, follow instructions for customizing it, and get tips for balancing an accurate report.
- Chapter 8: GL Impact in NetSuite: Instructions With Examples. Learn how NetSuite's GL Impact page allows users to quickly see which accounts are affected by a posted transaction, and how this feature helps reconciliation and year-end closing.
- Chapter 9: NetSuite Multi-Book: Tutorial & Instructions. Learn NetSuite’s multi-book accounting functionality by following instructions and examples and understand the difference between book-specific and book-generic records.
- Chapter 10: NetSuite Advanced Revenue Management: Tutorial & Best Practice. Learn how to use NetSuite’s Advanced revenue management feature to automate revenue forecasting, allocation, recognition, and auditing.
- Chapter 11: NetSuite Advanced Intercompany Journal: Tutorial & Examples. Learn how to post inter-subsidiary debit and credit transactions using different currencies.
More chapters are coming soon!


